As our world becomes increasingly connected and technology-driven, location-based services have become a ubiquitous part of our daily lives. From ride-sharing apps to food delivery services, location-based data is used to optimize our experiences and improve efficiency. At the heart of these applications lies the use of maps. While dynamic maps may be the go-to for many, static maps have also become an essential tool for developers and businesses alike.
In this blog post, we will explore the basics of static maps and their importance in location-based services. We will dive into the benefits of static maps, their use cases, and how to implement them in your application or platform using LocationIQ. If you’re a developer or business looking to enhance your location-based services, this post is for you. Whether you’re creating an application to provide directions or a platform to help your customers find nearby services, understanding static maps can be a valuable asset. Let’s get started!
What are static maps?
Static maps are essentially images of maps that are generated based on specific parameters. These images do not have any interactive functionality, unlike dynamic maps which allow users to interact with them. Static maps can be used for a variety of purposes, such as displaying directions, showing locations of points of interest, or providing a visual representation of data.
Static maps are typically created by specifying a set of parameters, such as the center point of the map, the zoom level, and the size of the image. The map image is then generated based on these parameters and returned as an image file that can be displayed in a web page or mobile app.
Why are static maps better?
Static maps are generally used to display a geographic area, providing a visual reference for the user. Static maps are quick, lightweight, and easy to implement. They don’t require a mapping library, can be created with minimal code, and are faster to load than dynamic maps. Their smaller file size allows for faster load times, making them a cost-effective solution for scenarios that don’t require user interaction.
| Feature | Static Map Tiles | Dynamic Map Tiles |
|---|---|---|
| Speed | Faster | Slower |
| Customization | Limited | More Customizable |
| Cost | Less Expensive | More Expensive |
| Maintenance | Lower Maintenance | Higher Maintenance |
| Compatibility | Universally accessible | Wide but Limited |
| User Interactivity | None | Interactive |
Where are Static Maps used?
Static maps are a valuable tool for businesses across various industries, providing a clear and easy-to-understand way to display location-based data. From real estate listings to fitness route tracking, static maps offer a visual representation of important information that can be easily shared with customers, clients, and team members. In this post, we will explore some of the most common use cases for static maps and how they are used in different industries. Whether you are in real estate, e-commerce, travel and tourism, fitness, or social media, static maps can help you communicate location-based data more effectively.
| Industry | Use case | Details |
|---|---|---|
| Real Estate | Property Locations | Display the general locations of properties |
| Real Estate | Property Boundaries | Display the boundaries of properties |
| E-Commerce | Product Mapping | Show the location of where a product is sourced from or manufactured |
| E-Commerce | Delivery Status Updates and Receipts | Provide delivery status updates and delivery route |
| Travel and Tourism | Destination Mapping | Display popular tourist destinations or attractions |
| Travel and Tourism | Itinerary Mapping | Display a suggested itinerary or tour route |
| Fitness | Location-based Challenges | Display location-based challenges, such as running a certain route |
| Fitness | Workout Tracking and Analysis | Display the routes taken during previous workouts and provides performance analysis |
| Social Media | Location Tagging | Allow users to tag their location when posting content on a simple map that displays the general area of the user’s location. |
| Social Media | Event Mapping | Display the location of events and gatherings |
Using LocationIQ to generate static maps
LocationIQ is a powerful API that provides a range of geocoding and mapping services. One of the services provided by LocationIQ is the ability to generate static maps. To use the LocationIQ static maps API, you will need to sign up for a free API key on the LocationIQ website. Once you have your API key, you can start making requests to the static maps API.
The basic syntax for a static map request using the LocationIQ API is as follows:
https://maps.locationiq.com/v3/staticmap?key=<YOUR_ACCESS_TOKEN>¢er=<latitude>,<longitude>&zoom=<zoom>&size=<width>x<height>&format=<format>&maptype=<MapType>&markers=icon:<icon>|<latitude>,<longitude>&markers=icon:<icon>|<latitude>,<longitude>'>The API call listed above is used to generate a static map image using the LocationIQ API. Here’s a breakdown of the various parameters used in the API call:
https://maps.locationiq.com/v3/staticmap: This is the endpoint URL for the LocationIQ Static Maps API.key: This is a required parameter that specifies your LocationIQ API access token. You need to replace<YOUR_ACCESS_TOKEN>with your actual access token.center: This parameter specifies the center of the map, which is determined by the latitude and longitude coordinates you provide. Replace<latitude>and<longitude>with the actual coordinates.zoom: This parameter specifies the zoom level of the map. The higher the zoom level, the closer the map will be. Replace<zoom>with the desired zoom level.size: This parameter specifies the size of the map image, which is determined by the width and height in pixels. Replace<width>and<height>with the desired values.format: This parameter specifies the format of the map image. You can choose betweenjpeg, jpg & png. Replace<format>with the desired format.maptype: Defines the type of the map to construct. Onlyroadmapis supported at the moment.markers: This parameter allows you to add markers to the map. You can add multiple markers by separating them with the|symbol. Each marker is specified by the icon and the latitude and longitude coordinates. Replace<icon>,<latitude>, and<longitude>with the desired values.
Overall, this API call allows you to generate a static map image with customized parameters using the LocationIQ API. For example, to generate a static map of New York City centered on Times Square with a zoom level of 16 and a size of 600×400 pixels, you would use the following request:
https://maps.locationiq.com/v3/staticmap?key=<YOUR_ACCESS_TOKEN>¢er=40.7128,-74.0060&zoom=16&size=600x400&format=png&maptype=roadmapThis request would return an image file of the static map that can be displayed in a web page or mobile app.

Customizing static maps
In addition to the basic parameters for generating a static map, the LocationIQ API provides a range of customization options. These include:
- Marker icons: You can add custom marker icons to the map to indicate specific locations.
- Overlays & Paths: You can add overlays such as lines and polygons to the map to highlight specific areas or routes.
Marker icons:
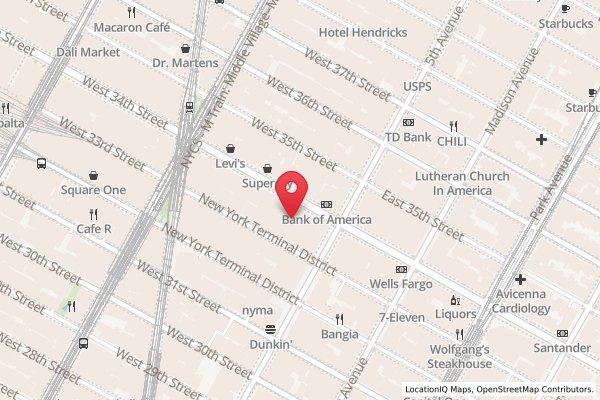
Let’s take a look at how to customize static map by adding marker icons with an add additional parameter to the API request. For example, to generate a static map of New York City with a custom marker icon indicating the location of the Empire State Building, you would use the following request:
https://maps.locationiq.com/v3/staticmap?key=<YOUR_ACCESS_TOKEN>¢er=40.748817,-73.985428&zoom=16&size=600x400&format=png&markers=icon:large-red-cutout|40.7484822318138,-73.98560481409379- The
centerparameter specifies the latitude and longitude of the center point of the map. In this URL, the center point is40.748817,-73.985428, which corresponds to the location of the Empire State Building in New York City. - The
markersparameter specifies the marker or markers to be added to the map. In this URL, we have added a single marker with the following properties:icon:large-red-cutout– This specifies the icon to use for the marker. In this case, we have chosen a large red cutout icon.40.7484822318138,-73.98560481409379– This specifies the latitude and longitude of the marker. In this case, we have chosen the same location as the center point of the map, which is the location of the Empire State Building.
Overall, this URL generates a static map image of the Empire State Building in New York City, with a single red cutout marker at the center of the image. You can copy this API call into your browser or use it in your application to generate the static map with the red marker for the Empire State Building. If you want to add more markers to the map, you can use additional markers parameters with different markerLocation values.
Overlays & Paths
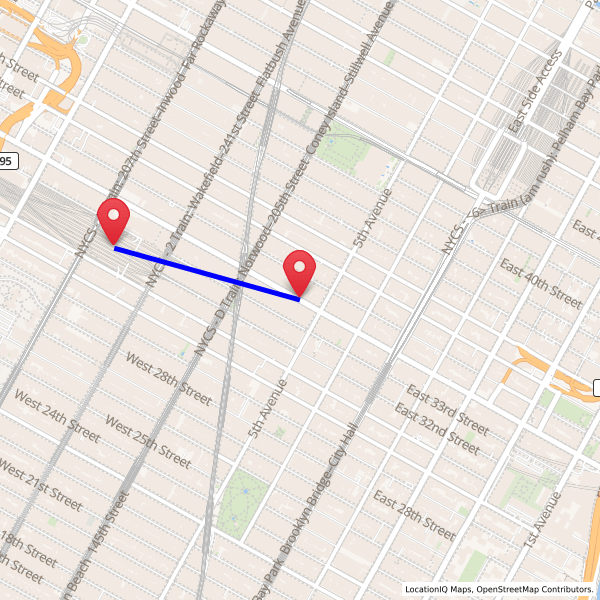
In this section, we’ll be looking at how to use the new URL format for generating static maps with LocationIQ, specifically focusing on how to draw a path between two locations on the map image. We’ll first draw a straight line between Empire State Building and Madison Square Garden. This is how the API call will look like
https://maps.locationiq.com/v3/staticmap?key=<YOUR_ACCESS_TOKEN>¢er=40.748817,-73.985428&zoom=15&size=600x600&format=png&markers=icon:large-red-cutout|40.748817,-73.985428&markers=icon:large-red-cutout|40.7505,-73.9934&path=weight:5|color:blue|fillcolor:%2390EE90|40.748817,-73.985428|40.7505,-73.9934- The
centerparameter specifies the center of the map. Here, it is set to the latitude and longitude of the Empire State Building, which is 40.748817 and -73.985428. - The
markersparameter specifies one or more markers to place on the map. Here, two markers are placed using theiconattribute with a value oflarge-red-cutout. The first marker is placed at the center of the map, which is the Empire State Building, and the second marker is placed at the location of Madison Square Garden, which is 40.7505,-73.9934. - The
pathparameter specifies a path to overlay on the map image. Here, theweightattribute with a value of5specifies the thickness of the path in pixels, thecolorattribute with a value ofbluespecifies the color of the path stroke, and thefillcolorattribute with a value of%2390EE90specifies the color to use as the fill. The path is specified using the latitude and longitude of the Empire State Building and the location of Madison Square Garden.
Let’s transform this so the path is not just ‘as the crow flies’ but a path that follows the street network. We’ll also change the color of icons so we have different markers for source and destination. To do this, I’ll first need to find the directions between Empire State Building and Madison Square Garden. This can be done via LocationIQ’s directions API.
- Get coordinates for Empire State Building and Madison Square Garden
- Pass them through LocationIQ’s directions API with Empire State as
sourceand madison square asdestination. For now, we’ll assume you’re familiar with the directions API. This is how the API call looks like:
https://api.locationiq.com/v1/directions/driving/-73.985428,40.748817;-73.9934,40.7505?key=%3CYOUR_ACCESS_TOKEN%3EThis is how the output from LocationIQ looks like:
{
  "code": "Ok",
  "routes": [
    {
      "geometry": "awuwF|gqbMhAmD|JrGoVtv@wFuDrAeE",
      "legs": [
        {
          "steps": [],
          "summary": "",
          "weight": 189.3,
          "duration": 189.3,
          "distance": 1438.7
        }
      ],
      "weight_name": "routability",
      "weight": 189.3,
      "duration": 189.3,
      "distance": 1438.7
    }
  ],
  "waypoints": [
    {
      "hint": "bK5FgJjIVqHWAAAAKgAAACMAAAAAAAAA8ThAQzSgFUJY_vtBAAAAANYAAAAqAAAAIwAAAAAAAABUgQEAZxKX-wrHbQJsEpf7EcdtAgIAfwfH89Mq",
      "distance": 0.884695,
      "name": "West 34th Street",
      "location": [
        -73.985433,
        40.74881
      ]
    },
    {
      "hint": "oDJvj1T4PKAXAAAAQAAAAAIAAAAAAAAA4z2oQTW_ZEL2DNg_AAAAABcAAABAAAAAAgAAAAAAAABUgQEADPWW-wHQbQJI85b7pM1tAgEAfwfH89Mq",
      "distance": 77.264462,
      "name": "West 33rd Street",
      "location": [
        -73.992948,
        40.751105
      ]
    }
  ]
}- We’ll now use the
geometryfrom the directions API output to get a path between source and destination.
https://maps.locationiq.com/v3/staticmap?key=<YOUR_ACCESS_TOKEN>¢er=40.748817,-73.985428&zoom=16&size=600x400&format=png&markers=icon:large-red-cutout|40.7484822318138,-73.98560481409379&markers=icon:large-blue-cutout|40.751105,-73.992948&path=color:0xff0000|weight:5|enc:awuwF%7CgqbMhAmD%7CJrGoVtv%40wFuDrAeE- The
markersquery parameter specifies the markers to show on the map. In this case, two markers are specified: one for the Empire State Building (marked in red), and one for Madison Square Garden (marked in blue). - The
pathquery parameter specifies the path to show on the map, which is the route between the two markers. The path is defined using the geometry from the Directions API, which provides a set of latitude and longitude coordinates that define the path. The path is styled with a red stroke color and a weight of 3 pixels.
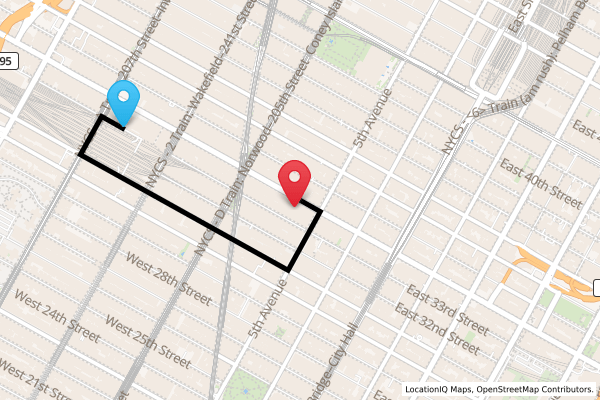
There we have it, a static map image that shows a route between the Empire State Building and Madison Square Garden, with markers for each location and a path line connecting the two markers.
In conclusion, static maps are a valuable asset for developers and businesses looking to enhance their location-based services. By using LocationIQ’s static map API, you can create visually appealing maps with paths and markers, providing users with accurate directions and valuable information. Incorporating static maps into your applications or platforms improves the user experience and boosts efficiency. With LocationIQ, you can stay ahead of the curve and deliver exceptional location-based services to your customers.
Ready to start using static maps in your own projects? Sign up for a free LocationIQ API key and get started today. With LocationIQ, you can easily create high-quality, custom static maps that perfectly fit the needs of your project. Try it out and see for yourself how easy it can be to integrate static maps into your application. Sign up now and start exploring the possibilities!